Contents
Create Storage Account
Storage Accounts are one of the 3 basic cloud technologies along with VMs and virtual networks.
Storage can be used for 2 purposes:
- Store files just as you would on a hard disk
- There are number of services in Azure that need a storage account. EG: The backend for a virtual machine, storing log files,
NOTE: VMs generally run on a managed storage account, but they can run on a general storage account. In this section we are talking about general storage accounts.
Creating a Storage Account
You can do this through “Create a resource” area or “Storage accounts”
Create options
There are 5 tabs with options when creating Storage Accounts
Basic Tab:
- Subscription
- Resource Group
- Storage Account Name (this needs to unique across all of Azure)
- Location (different costs for different locations)
- Account Kind (generally use Storage V2)
- Performance: Premium (SSD) or Standard (HDD). Premium is more expensive and does have some capacity limits.
- Access Tier (you set this as a default but it can be changed on per file basis:
Hot – you are charged a certain amount for storage and a certain amount for accessing the data
Cold – this is half the price for storage, but twice the price for access. Great for archives and backup files. - Replication: see section 5 below on Redundant storage for explanations of these
- LRS (Locally Redundant Storage): keeps 3 copies of data on different drives, in the same data centre
- ZRS (Zone Redundant Storage): distributes 3 copies of data across different data centres in the same region.
- GRS (Geo redundant storage): stores 6 copies of your files in 2 data centres that are in different regions
- RA-GRS (Read access geo redundant storage): allows you to have read only data in a different Geo location. You can have the writable data in your region, and the readable only data in a different location. This is a performance hack.
Networking Tab:
Connectivity Method:
- Public Endpoint (all networks): storage is accessible by anyone using the URL
- Public Endpoint (Selected Networks): you select the Virtual network and the use firewall or NSG to protect the data.
- Private Endpoint
Advanced Tab:
- Secure Transfer Required: enabled by default. Means SSL is used for data transfer.Large File Shares: disabled by default. When on allows files up to 100TB
- Blob Soft delete: when enabled allows you to recover a deleted file for a certain number of days
- Data Lake Storage Gen2: this is a different type of file system
Tags Tab
This is the same as Tags on other resources. Basically its tagging of metadata on resources.
Templates
When creating a Storage account you can download a template to deploy this storage account.
Access Keys and SAS
Blob Service Endpoints
These are URLS you can use to access your data in a storage account.
- Primary : this is the URL of the main data storage
- Secondary: this is the URL of the redundant data storage
Access Keys
You need the access key to access the storage URLs mentioned above.
You can find these keys in “Storage Accounts -> Access Keys”.
You can regenerate new keys if your key has been compromised.
NOTE: keys are not the recommended way for accessing data. They can be used in testing or small environments, but if someone gets their hands on your key they have access to everything.
This is the recommended way of giving access to storage to programs or other users.
SAS is a token, generated using your access key, that use to grant access to someone else.
Generating SAS
You can generate an SAS using the following options:
- Services: Blob, file, queue, table
- Resource type: service, container, object
- Permissions: List, write, read etc…
- Start and expiry times
- Allowed IP addresses
- Allowed protocols: HTTPS, HTTP
- Signing key: which key to sign with
Once you generate the SAS you are given the following:
- Connection String
- SAS token
- Blob service SAS URL
You can give the SAS token to client applications that require access to the storage. Client applications provide the SAS URI to Azure Storage as part of a request. Then, the service checks the SAS parameters and the signature to verify that it is valid. If the service verifies that the signature is valid, then the request is authorized. Otherwise, the request is declined with error code 403 (Forbidden).
NOTE: once you generate the SAS you can only see it once. But you can create an unlimited amount of them.
Storage Explorer
Storage types
Containers (BLOB): This is a service for storing large amounts of unstructured object data, such as text or binary data. You can use Blob storage to expose data publicly to the world, or to store application data privately. Common uses of Blob storage include:
- Serving images or documents directly to a browser
- Storing files for distributed access
- Streaming video and audio
- Storing data for backup and restore, disaster recovery, and archiving
- Storing data for analysis by an on-premises or Azure-hosted service
File Shares
This is a serverless SMB file share that can be mounted from Windows or Linux.
Tables
This is different from an SQL database, but data is stored in rows and columns.
Queues
This is effectively a messaging system
Storage Explorer
Web Storage Explorer
You can use Storage Explorer from the Azure home portal. This gives you a “Windows Explorer” type view into your Azure storage. You can search, sort, view properties etc…
You can upload files to your storage through here.
Storage Explorer Client
You can download this for Windows, Linux or Mac.
Log analytics
In this section we look at how you can tell your storage account is performing.
If you go to “Storage Account -> Overview” you can see some basic data such as:
- Data egress and ingress on your storage account.
- Average latency
- Request breakdown (success, authentication errors etc…)
You can view this data per: account, container, file, table
Monitoring
There is a “Classic” monitoring and a new monitoring section
Monitoring (Classic)
To get here go to “Storage Account -> Monitoring (Classic)”
This monitoring can be turned of or off. This monitoring will give you performance metrics on your storage account. You can save edit the how often the metrics are recorded and choose to output this to a log file.
Monitoring
To get here go to “Storage Account -> Monitoring”
This is the new monitoring section. From here you can build your own graphs on things like capacity.
- Alerts: You can also create alerts here. EG: set an alert to message you capacity reaches a certain size. There is a cost of 10c per month, per alert.
- Insights: this section has some predefined graphs you can use. You can edit these or go to the “gallery” and select others
Redundant Storage
Azure has a number of options for redundant storage:
- LRS (Locally Redundant Storage): keeps 3 copies of data on different drives, in the same data centre
- ZRS (Zone Redundant Storage): distributes 3 copies of data across different data centres in the same region.
- GRS (Geo redundant storage): stores 6 copies of your files in 2 data centres that are in different regions
- RA-GRS (Read access geo redundant storage): allows you to have read only data in a different Geo location. You can have the writable data in your region, and the readable only data in a different location. This is a performance hack.
Geo-Replication
If you go to “Storage accounts -> Geo-replication” it will show you a map of where your data is being stored (If using GRS).
Failover
You can setup failover between your Geo-replicated storage accounts from here.
RBAC Authentication for Storage
Another way to give a user access to data stored in a Storage Account is using Role Based Access Control (RBAC).
To assign a rile to a user on a Storage Account:
- Go to the Storage Account and select “Access Control (IAM)”
- Click on “Add”, then “Add role assignment”
- In the “Role” you drop down you can select from many different roles. In this example we select “Storage Blob data reader”
- Select the user to assign this to
NOTE: this only gives the user access to the selected Storage Account, not all your storage accounts.
Copy files with AZCopy
AzCopy is a command line tool you can download from Microsoft. It allows you to copy files to your Storage Accounts and move them around in your Storage Accounts.
https://docs.microsoft.com/en-us/azure/storage/common/storage-use-azcopy-v10
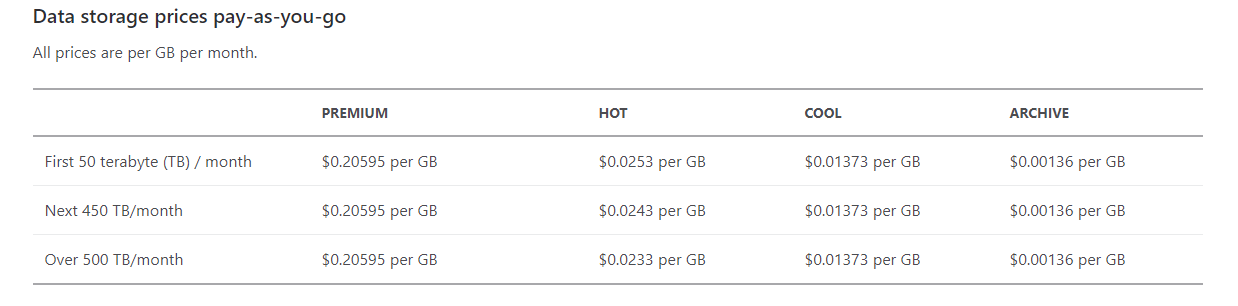
Access Tiers
The Access Tier is the basis for setting up your storage in the most cost effective manner. This is where you can set how much you are going to get charged for storage and how much you are going to get charged for access.
- Hot – Optimized for storing data that is accessed frequently.
- Cool – Optimized for storing data that is infrequently accessed and stored for at least 30 days. This is 50% cheaper than hot for storage, but the access cost is double.
- Archive – Optimized for storing data that is rarely accessed and stored for at least 180 days with flexible latency requirements, on the order of hours. This is cheaper again for storage, but much more expensive for access. It can take a long time to retrieve files from the archive.
- Premium – this tier has to be setup on creation, it cant be added afterwards. You select this in the “Performance” section when creating the storage account. This tier has a much better performance, up to 10 times faster. The storage is much more expensive than hot, but the access is cheaper.
The following considerations apply to the different access tiers:
- The access tier can be set on a blob during or after upload.
- Only the hot and cool access tiers can be set at the account level. The archive access tier can only be set at the blob level.
- Data in the cool access tier has slightly lower availability, but still has high durability, retrieval latency, and throughput characteristics similar to hot data. For cool data, slightly lower availability and higher access costs are acceptable trade-offs for lower overall storage costs compared to hot data. For more information, see SLA for storage.
- Data in the archive access tier is stored offline. The archive tier offers the lowest storage costs but also the highest access costs and latency.
- The hot and cool tiers support all redundancy options. The archive tier supports only LRS, GRS, and RA-GRS.
- Data storage limits are set at the account level and not per access tier. You can choose to use all of your limit in one tier or across all three tiers.
Blobs in all three access tiers can coexist within the same account.
You can also set the tier per files.
Lifecycle Management
This can be used to set rules on your storage to move the data into different access tiers:
- Data first written is in Hot tier
- After 30 days it is no longer accessed as often and i moved to Cold storage tier
- After 180 days it is accessed even less frequently and is moved to Archive tier
You can find this in “Storage Account -> Blob Service -> Lifecycle Management”
Object Replication
Basically this concept is taking any files written to your storage account and writing them to a different storage account or location.
You can find this in “Storage Account -> Blob Service -> Object Replication”
- From here you can setup Replication rules. In the rule you can set
the destination account the data will be copied - Source container
- Destination container
- Filters
The accounts may be in different location but need to have the same Access Tier set. Once replicated you can change the tier.
You can also setup rules here to copy data from another account to your account.
NOTE: data this is replicated is in a read only state.