Contents
Introduction to Load Balancing
What is a load balancer?
“An Azure load balancer is a Layer-4 (TCP, UDP) load balancer that provides high availability by distributing incoming traffic among healthy VMs. A load balancer health probe monitors a given port on each VM and only distributes traffic to an operational VM.
You define a front-end IP configuration that contains one or more public IP addresses. This front-end IP configuration allows your load balancer and applications to be accessible over the Internet.”
From <https://docs.microsoft.com/en-us/azure/virtual-machines/windows/tutorial-load-balancer>
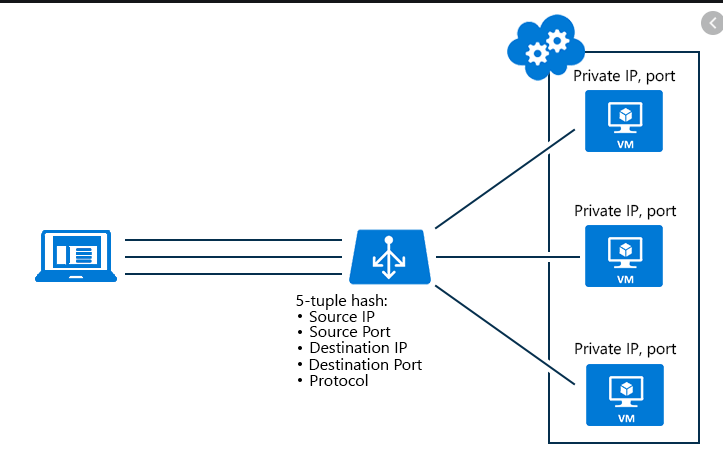
It uses an algorithm to distribute the load.
Load Balancers not only distribute the traffic to reduce load on each VM, but also offer redundancy (i.e.: if one of the VM’s goes down the system is still operational)
Creating a Load Balancer
- In Marketplace search for Load Balancer and click Create
- Give it a name
- Type: is it public or private? In this case I am going for public
- Create new Public IP and give it a name
- Set the Subscription and resource group
- Set the location
- Click Create
Basic Vs Standard Sku Load Balancer
Basic supports up to 100 instances, Standard supports up to 1000
Standard has more security and monitoring features.
Setup Load Balancer
To setup the load balancer we will need some VMs in an availability set (in the Basic Load Balancer you can only use availability sets). Previous sections covered how to set this up. You should also setup IIS on these servers to be able to test the Load Balancer
Adding VMs to Load Balancer
- Go to the Load Balancer -> Backend Pools
- Click on Add
- Give it a name
- Associated to: select the Availability set the VMs are in. The availability set must be in the same region as the Load Balancer
- Target Virtual Machines: select the VMs and the network card associated with them. You need to do this for each VM
- Click OK
Health Probes
These monitor the health of the VMs being load balanced. It does this by checking the status of a port (EG: check a webpage is responding) and removes any VM that doesn’t respond or isn’t healthy
Add Health Probe
In this example we will set a Health Probe to check a webpage is responding every 5 seconds, then remove a VM if it has 2 failures.
- Go to the Load Balancer ->Health Probes
- Click on Add
- Give it a name
- Protocol: HTTP
- Port: 80
- Path: a sample webpage on the server. It is good practice to have a test page for this.EG: /health.htm
- Interval: 5
- Unhealthy Threshold (consecutive failures): 2
- Click OK
Set Load Balancing Rules
In this example we will set the rule for our Load Balancer sending port 80 TCP traffic to the Front end web servers
- Go to the Load Balancer -> Balancing Rules
- Click on Add
- Give it a name
- Frontend IP Address: Load Balancer front end IP
- Protocol: TCP
- Port: 80 (this is the source port from the public)
- Backend port: 80 (this is the destination port on the webservers)
- Backend pool: the backend pool we setup previously
- Health probe: the health probe we setup previously
- Session persistence: you can use this option to send the same client to the same VM if you wanted. If “none” is selected it will randomly send the client to a new VM every time (as part of a new session)
- Click OK
Once this rule gets deployed we will have a working load balancer
Front End IP Configuration
You can add another public IP to the load balancer to be used for another application or website. You can use the same backend pool of VMs for this, you just need to create another set of rules
Add a second Public IP
- Go to the Load Balancer -> Front End Ip Configuration
- Click on Add
- Give it a name
- IP Address: choose from a public IP you have already created
- Click OK
Add Rules for second load balancing set
In this second rule set we will accept traffic from port 80 to the second public IP address, but send it to port 8080 on the same VM s in the existing backend pool.
- Go to the Load Balancer -> Balancing Rules
- Click on Add
- Give it a name
- Frontend IP Address: select the second Front IP we created
- Protocol: TCP
- Port: 80 (this is the source port from the public)
- Backend port: 8080 (this is the destination port on the webservers)
- Backend pool: the backend pool we setup previously
- Health probe: a health probe to check port 8080
- Session persistence: you can use this option to send the same client to the same VM if you wanted. If “none” is selected it will randomly send the client to a new VM every time (as part of a new session)
- Click OK
Create a Test Environment Quickly Using GitHub
There are hundreds of templates in the this GitHub repository that you can deploy directly to Azure
https://github.com/Azure/azure-quickstart-templates
Troubleshoot a Load Balancer
In this section we look at troubleshooting the different areas
Frontend IP Configuration
- Is it the correct public ip?
- Does the domain name resolve to this IP?
- Is this config associated with a rule?
Backend Pools
- Are the correct VMs in the pool? Correct NICs?
- What is the status of the VMs?
Health Probes
- Check the health rules
Load Balancing Rules
- Are these setup correctly?
Application Gateway
The Load Balancer works at Layer 4 (Transport Layer) and can only understand IP addresses, not URLs. If you need to Load balance based on URLs you need to go to the Application Layer. The other benefit of an application gateway is that you can have a firewall associated with it.
“Microsoft Azure Application Gateway provides an Azure-managed HTTP load-balancing solution based on layer-7 load balancing. Application load balancing enables IT administrators and developers to create routing rules for network traffic based on HTTP. The Application Gateway service is highly available and metered.”